

The first craft project I took on for my wedding was making a flower pin for each guest in our wedding colours. These were to go on their place cards. While they ended up taking a lot longer to make than I had thought, they were a lot of fun. It was neat to see our guests wearing them throughout the evening. I put a bowl on one of our tables where guests could exchange colours, take any extras, or leave theirs if they didn't want to take it home with them. By the end of the night all of them were gone.
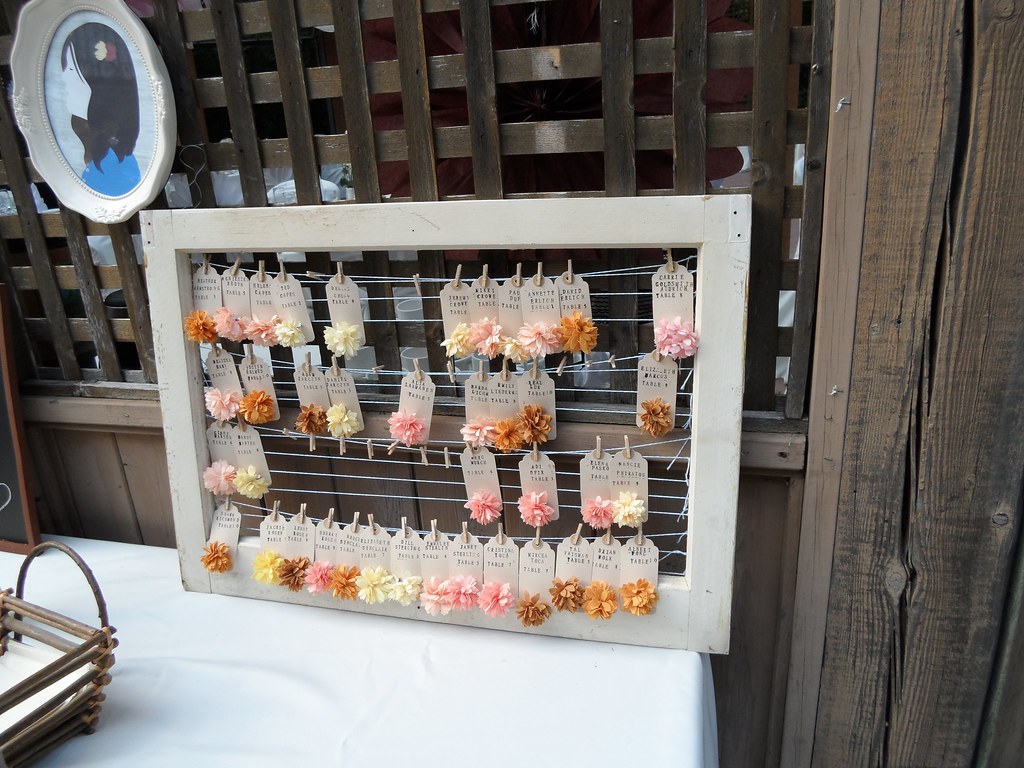
I pinned each flower to a little cardstock tag with each guest's name and table number stamped on it. I strung some bakers twine across an old wooden window frame we had sitting in our basement, and used mini-clothes pins to clip each tag on. We ended up filling the entire frame, but unfortunately, I'm not sure we have any pictures of it completely full.
Here's how to make them:

1. Gather your materials - fabric in the colours/patterns of your choice (each flower will need about 8 layers, so make sure you have enough), a paper flower template (you can make this on your own..make it the size you'd like your flower to end up and make sure you include lots of petals..a cardstock template will last longer), pin closures, a fine tipped pen for tracing, needle & thread, and scissors.
2. fold your fabric so there are about 4 layers. I found if I had any more layers it would be too difficult to cut. Trace your template onto your fabric.
3. Cut out your flower shapes.
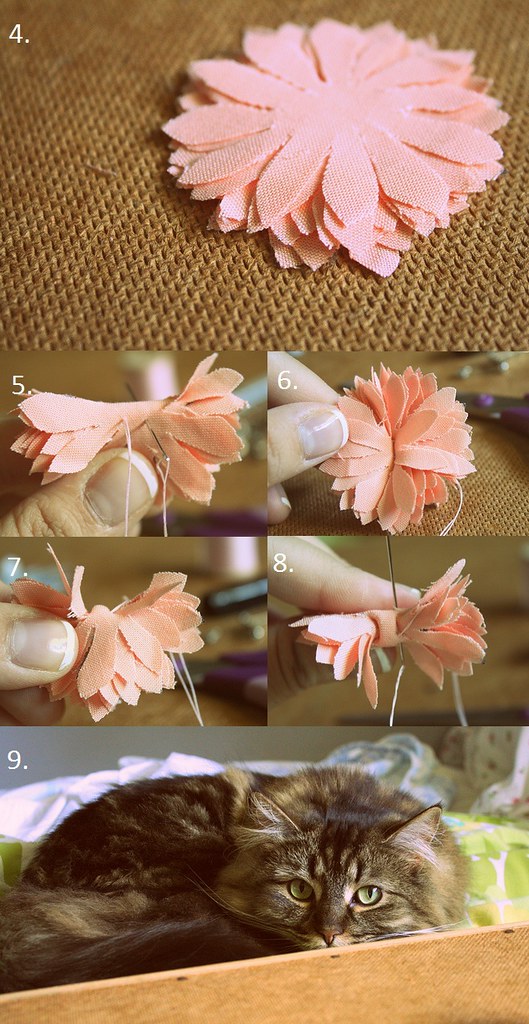
4. lay 8 of your flower shapes on top of each other so the petals are overlapping.
5. fold your flower shapes in half and use your needle & thread to hold them in place. Make sure you sew far enough from the fold that all the layers are caught by your thread. Sew back and forth a few times. Don't knot or cut your thread at this point, you still need it.
6. turn your flower over and find the center layer.
7. using your finger to hold the center part open, fold your flower the other way. There should be a funny square shaped bump on the back.
8. sew through your flower using the square bump as a guide. Again, make sure to catch all the layers with your needle & thread. If it's too thick to sew through comfortably, try pushing the back of the needle against a hard surface to guide it through (make sure to use a surface you don't mind scratching..and don't use your leg because there's a good chance it will hurt!). Again, don't tie off or cut your thread.
9. if you have a cat, they've probably joined you by now. They're probably sitting right on top of your project too.
 10. hold your safety pin over the square bump on the back of your flower and use your needle & thread to sew in and out of the little holes on the back a few times. I usually do about three or four in each just to make sure it's secure.
11. if you prefer, you can hot glue a piece of felt to the back of your pin to hide your sewing. I didn't do this because I was making so many.
12. fluff up your petals, and you're finished. Enjoy!
Instead of a pin, try attaching them to a hair clip or headband!
5. fold your flower shapes in half and use your needle & thread to hold them in place. Make sure you sew far enough from the fold that all the layers are caught by your thread. Sew back and forth a few times. Don't knot or cut your thread at this point, you still need it.
6. turn your flower over and find the center layer.
7. using your finger to hold the center part open, fold your flower the other way. There should be a funny square shaped bump on the back.
8. sew through your flower using the square bump as a guide. Again, make sure to catch all the layers with your needle & thread. If it's too thick to sew through comfortably, try pushing the back of the needle against a hard surface to guide it through (make sure to use a surface you don't mind scratching..and don't use your leg because there's a good chance it will hurt!). Again, don't tie off or cut your thread.
9. if you have a cat, they've probably joined you by now. They're probably sitting right on top of your project too.
11. if you prefer, you can hot glue a piece of felt to the back of your pin to hide your sewing. I didn't do this because I was making so many.
12. fluff up your petals, and you're finished. Enjoy!
Instead of a pin, try attaching them to a hair clip or headband!
2 comments:
babyliss
ugg boots
louis vuitton outlet
louis vuitton outlet
chanel outlet
chicago bulls jersey
indianapolis colts jerseys
chelsea jersey
coach outlet
tory burch outlet
toms shoes
ray ban sunglasses
cheap toms
nba jerseys
polo ralph lauren outlet
five fingers shoes
gucci shoes
longchamp handbags
babyliss pro
tory burch sandals
ray ban sunglasses, http://www.raybansunglass.co.uk
chanel 2.55
oakley outlet
michael kors uk
chicago bears jerseys
nike running shoes
coach outlet canada
oakley sunglasses
links of london uk
cheap oakley sunglasses
true religion jeans, http://www.truereligionjeanscanada.com
michael kors canada, http://www.michaelkorsoutletcanada.in.net
gucci
abercrombie
cheap jordans
2015827caihuali
nfl jerseys
cheap ugg boots
carrera sunglasses
polo ralph lauren
ugg boots
moncler jackets
scarpe hogan
true religion jeans
air jordan 14
coach outlet
201710.25wengdongdong
Post a Comment